Honeypot Diaries: SSH Authorized Keys
One of the many reasons I decided to deploy honeypots is to be able to observe attacker tactics, techniques, and procedures (TTPs). This blog post will share a frequently used tactic that attackers use to keep access once they have compromised one of my distributed honeypots. You may benefit from the rest of this content if you use or manage systems that allow remote access using a Secure Shell (SSH) client.
File Triage
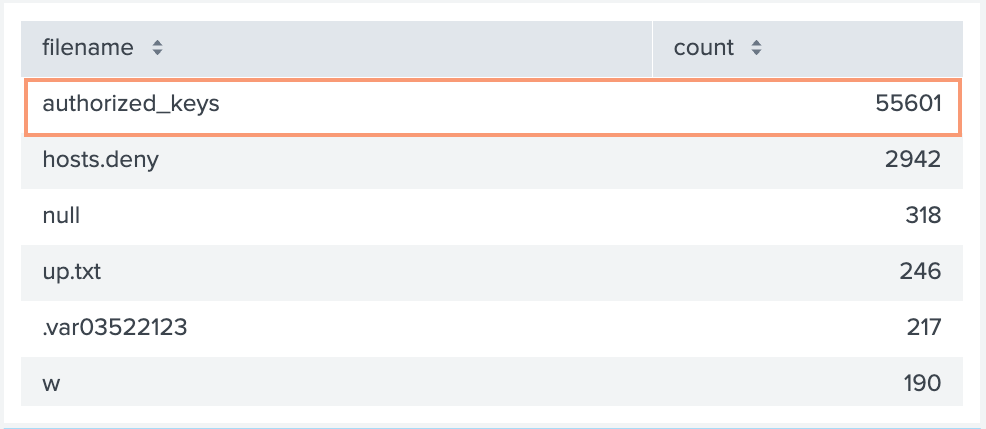
Splunk is the primary SIEM I use to conduct initial triage and analysis of the threat data collected by my honeypots. For example, the screenshot below shows a Splunk query for the top ten files created by attackers across all honeypots over the last 12 months.

The table below shows the query result, where the authorized_keys file tops the list by a large margin. You should know that files that land on the honeypots by download, upload, or console redirection are all treated as a cowrie.session.file_download.
The authorized_keys file is used to facilitate SSH public key authentication and is typically located at the following file path:
$HOME/.ssh/authorized_keysIf you wanted to use the authorized_keys file for your user account you would run the following command in a terminal:
ssh-keygen -t ed25519 -f ec2-sshkey-ed25519Which would produce output similar to the text below.
Generating public/private ed25519 key pair.
Enter passphrase (empty for no passphrase):
Enter same passphrase again:
Your identification has been saved in ec2-sshkey-ed25519
Your public key has been saved in ec2-sshkey-ed25519.pub
The key fingerprint is:
SHA256:RHDcuBw3XmzUWiXdVluWhZxZpNCAAX+uf6YTYI3BGPU [email protected]
The key's randomart image is:
+--[ED25519 256]--+
|      .o=Oo=+=.O&|
|       o=.B.+.O=*|
|       ..=.BEo.o |
|       .o =oo    |
|        S. ..    |
|           ..    |
|          .  .   |
|           .. o  |
|            o=   |
+----[SHA256]-----+
In addition to the output above two files are created. The private key which I’ve given the name ec2-sshkey-ed25519 and the public key with the same name and a ‘.pub’ extension.
tankmek@lab:~ $ ll
Permissions Size User    Date Modified Name
.rw-------   432 tankmek 17 Apr 19:12  ec2-sshkey-ed25519
.rw-r--r-- 112 tankmek 17 Apr 19:12 ec2-sshkey-ed25519.pubThe contents of the ec2-sshkey-ed25519.pub file is what goes into the authorized_keys file. Take a look at the example below.
tankmek@lab:~ $ cat ec2-sshkey-ed25519.pub
ssh-ed25519 AAAAC3NzaC1lZDI1NTE5AAAAIOOEGgdKHppjl5uYYuOpCRi7gGDFii6L1n/MH0m8sCXM [email protected]
The first part of the output identifies the key type followed by the base64 encoded key and an optional comment.
Persistence Tactic
When attackers try to maintain access to compromised systems, this is known as persistence. The MITRE ATT&CK framework places account manipulation using SSH Authorized Keys as a sub-technique of the persistence tactic. The command below is executed simultaneously using the logical AND operator and essentially adds an attacker controlled SSH key to the compromised account.
cd ~ &&rm -rf .ssh &&mkdir .ssh &&echo "ssh-rsa AAAAB3NzaC1yc2EAAAABJQAAAQEArDp4cun2lhr4KUhBGE7VvAcwdli2a8dbnrTOrbMz1+5O73fcBOx8NVbUT0bUanUV9tJ2/9p7+vD0EpZ3Tz/+0kX34uAx1RV/75GVOmNx+9EuWOnvNoaJe0QXxziIg9eLBHpgLMuakb5+BgTFB+rKJAw9u9FSTDengvS8hX1kNFS4Mjux0hJOK8rvcEmPecjdySYMb66nylAKGwCEE6WEQHmd1mUPgHwGQ0hWCwsQk13yCGPK5w6hYp5zYkFnvlC8hGmd4Ww+u97k6pfTGTUbJk14ujvcD9iUKQTTWYYjIIu5PmUux5bsZ0R4WFwdIe6+i6rBLAsPKgAySVKPRK+oRw== mdrfckr">>.ssh/authorized_keys &&chmod -R go= ~/.ssh &&cd ~Take note of the echo command that appends the attacker provided SSH key to the authorized_keys file of the compromised admin user account. The comment for this key is mdrfckr. I’ve seen this same key used with a modified comment, so don’t use that as your only indicator of compromise (IoC).
These are the two most prevalent SSH keys seen using command line redirection.
ssh-rsa AAAAB3NzaC1yc2EAAAABJQAAAQEArDp4cun2lhr4KUhBGE7VvAcwdli2a8dbnrTOrbMz1+5O73fcBOx8NVbUT0bUanUV9tJ2/9p7+vD0EpZ3Tz/+0kX34uAx1RV/75GVOmNx+9EuWOnvNoaJe0QXxziIg9eLBHpgLMuakb5+BgTFB+rKJAw9u9FSTDengvS8hX1kNFS4Mjux0hJOK8rvcEmPecjdySYMb66nylAKGwCEE6WEQHmd1mUPgHwGQ0hWCwsQk13yCGPK5w6hYp5zYkFnvlC8hGmd4Ww+u97k6pfTGTUbJk14ujvcD9iUKQTTWYYjIIu5PmUux5bsZ0R4WFwdIe6+i6rBLAsPKgAySVKPRK+oRw==

ssh-rsa AAAAB3NzaC1yc2EAAAADAQABAAACAQC/yU0iqklqw6etPlUon4mZzxslFWq8G8sRyluQMD3i8tpQWT2cX/mwGgSRCz7HMLyxt87olYIPemTIRBiyqk8SLD3ijQpfZwQ9vsHc47hdTBfj89FeHJGGm1KpWg8lrXeMW+5jIXTFmEFhbJ18wc25Dcds4QCM0DvZGr/Pg4+kqJ0gLyqYmB2fdNzBcU05QhhWW6tSuYcXcyAz8Cp73JmN6TcPuVqHeFYDg05KweYqTqThFFHbdxdqqrWy6fNt8q/cgI30NBa5W2LyZ4b1v6324IEJuxImARIxTc96Igaf30LUza8kbZyc3bewY6IsFUN1PjQJcJi0ubVLyWyyJ554Tv8BBfPdY4jqCr4PzaJ2Rc1JFJYUSVVT4yX2p7L6iRpW212eZmqLMSoR5a2a/tO2s1giIlb+0EHtFWc2QH7yz/ZBjnun7opIoslLVvYJ9cxMoLeLr5Ig+zny+IEA3x090xtcL62X0jea6btVnYo7UN2BARziisZze6oVuOTCBijuyvOM6ROZ6s/wl4CQAOSLDeFIP5L1paP9V1XLaYLDBAodNaUPFfTxggH3tZrnnU8Dge5/1JNa08F3WNUPM1S1x8L2HMatwc82x35jXyBSp3AMbdxMPhvyYI8v2J1PqJH8OqGTVjdWe40mD2osRgLo1EOfP/SFBTD5VEo95K2ZLQ==Detection
So how can we detect the presence of these well known keys and scale when new keys are discovered? A simple solution is to use the grep command with an input file.
# grep -ralf bad_keys.txt /home/*/.sshYou would add each key as a line to the bad_keys.txt file remembering not to include any whitespace else grep will use it as a search pattern. If your system home path is different then adjust the path accordingly.
Another solution is to create a shell script like the one below and attach it to a cronjob.
#!/bin/bash

HMDIR='/home'
KEYFILE='./bad_keys.txt'

if [[ -e $KEYFILE ]]; then
  grep -ralf $KEYFILE ${HMDIR}/*/.ssh
fi
Mitigations
There are a number of way to reduce the chances that an attacker installs foreign SSH keys on your system. One solution is to use the chattr command as shown below, to make the authorized_keys file immutable.
$ sudo chattr +i ~/.ssh/authorized_keysIf you are on a BSD system then you can use the chflags command:
# chflags schg ~/.ssh/authorized_keysI have seen attacker code that tries to undo the chattr and chflag commands, so as long as the attacker has not gained privileged access you have some time for detection.
Thanks for reading.