Replacing the Default Splunk Web SSL Certificate
This post goes over how to sign a SplunkWeb Certificate Signing Request (CSR) using my Root CA in pfSense. I do not cover creating the Root CA.
Step 1: Create the directory for the certificates
splunk@siem:~$ mkdir /opt/splunk/etc/auth/certs
Step 2: Generate the private key and temporary password
splunk@siem:$ cd /opt/splunk/etc/auth/certs
splunk@siem:$ splunk cmd openssl genrsa -des3 -out SplunkWebPrivate.key 4096
Generating RSA private key, 4096 bit long modulus
Enter pass phrase for SplunkWebPrivate.key: (put something you will remember. we will remove it in the next step)
Step 3: Remove the password from the private key
SplunkWeb does not support private key passwords
splunk@siem:~$ splunk cmd openssl rsa -in SplunkWebPrivate.key -out SplunkWebPrivate.key
Step 4: Generate the Certificate Signing Request (CSR)
splunk@siem:~$ splunk cmd openssl req -new -key SplunkWebPrivate.key -out SplunkWebCert.csr
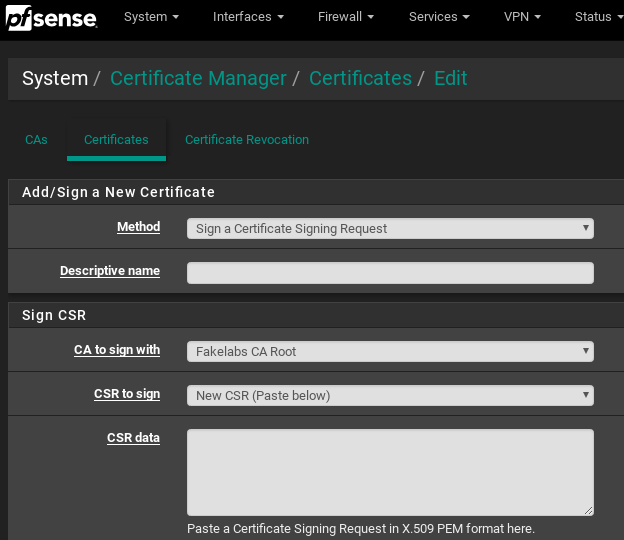
Step 5: Copy and paste the output into the pfSense CSR data form field:
The CSR is usually created in a Base-64 based PEM format.
splunk@siem:~/certs$ cat SplunkWebCert.csr —–BEGIN CERTIFICATE REQUEST—– MIIEoTCCAokCAQAwXDELMAkGA1UEBhMCVVMxCzAJBgNVBAgMAkNBMRUwEwYDVQQH DAxMZWd1bmEgQmVhY2gxDzANBgNVBAoMBlNhd2JveDEYMBYGA1UEAwwPc2llbS5z YXdib3gubmV0MIICIjANBgkqhkiG9w0BAQEFAAOCAg8AMIICCgKCAgEA1W/U0EtX sQd2ZUKvU52FSlNH4mhEARvPvTPU7tgChx9Kk2kHFfvtiCQbn49+4+N87Dw/9iPV lMrYS/6P+5V+hsCkv0zhi8LAn5pV1ygRdxrRGf5MKMjpbwfx7bXk96xwxmdQ0BOR xY/vGrmLh/CCizNOJE/H4PiqoHMFih/rB1Zf1ScWWaJ75o0iL5R+V32kGoAWAnUi 20kOnoDM4CExWJ1bipz4tdJyY5oHSRPjRDa4j7YchFlOpXS+4S9NC+vr6MWb/8et /Shn0IKeAaB7PioDfQRg/+UtHdPyefBUw8bzdHyRoTEELPHds58AHEXo/cGQV77h FeJB3S3OGfTjUMGeVWb9z+R7S/rb4P5GUU16ltQFzLwe23VzhnQQBUGynTUdw9u6 ptGzL4PaH3L8RVbIL9PaNMor3wLOpBBpalE2I6fZ7g8wU28wfXQrAA/fOPD6Ckcw 3CgE4Vx1bk7hDSu8daq5n9fTshloKA7uIiejkxlqt52CIFzg9ApboIkac5p2QXum p5O6vudvYhm5YCbh1nIMyD5tMcexQTFtVN2oNgPys1VSg3bWHQ2Yz5zg73et3qDI xdC+TBVBJAMMnQEkHFG9/zfmslx3ACdp2+lV84CHhWlPbWUciPGAwzWVPQihtv1H fUkGdSManMWz9rlMoyhkpyksFo5/UC6+wysCAwEAAaAAMA0GCSqGSIb3DQEBCwUA A4ICAQC7fTNdyRdfzVeS9NQcfDaVHbDsMMb5+kgcgLq1xATwDRyFLVxMb2w8+cqe TXLjCx48aBkeLu7cuk7FrKxXVeGrZsySsDQGCIbHycNd2qytRR9R1e5uu0syforJ Hdb4flNpVlCw8XHKbKxKCRVetAMfRvcf4tdIQFWKtYLKD8EmPlcFCEQk2g9/jyaI 85RvMPXi/gM8Jwkk77M1vVP/0V2vvRu5yUoetrFNKTtzw2o5F1WGquLIYNaq7z5H PRSOGL3fYhQ7rsmNobPUaLhj3jkXHjfY6g96LYpfdvFXAC4kIMfBeCMIc7U2cLLi GjELjyRdynhZwMU6b83AbCPONoVi8t5ArOZ7tXBgPYTBaFQzcxkL5YqmZtTB6MpU MBaOoDa03xtZzuIJsHFurtm0JGzDCCb7u+T+IIzHgSUIyPMoEoZPVLJvG+lq4kkw eyNWQy3z+drt+icHkvnbpuHM6T4r3CbnD0MVNquekLGtpLmsJ/wo6rJFUmyquQXw cvC3/d277crqvPYW1mGx8MMRgCMTJS8Ilj+UeSTo8PKo/P2iv0Mi+LChwZPYB5p5 O0hHCADce1JwouuIosXYZvg+vaU04SHYXsbTksANHKl6lIk5OO5sf5F70ydgJCPA SwJJPrEA6otbNfxjVKAxSOfKpGZ1OLfs0XuVGzfb4PMbS8gtAg== —–END CERTIFICATE REQUEST—–
Step 6: Save and export the Server Certificate and the CA Public Key.
If you hover over the first green icon it will say “Export Certificate”. The certificates will have a .crt extension, but you can change them to .pem

Step 7: Combine the Server Certificate and CA Public Certificate in that order
splunk@siem:~/etc/auth/certs$ cat SplunkWebCert.pem FakelabsIssuerCA.pem >Splunk.pem
Before you continue validate that the SplunkWebCert.pem, CACert.pem, and CombinedCert.pem all have the same output.
splunk@siem:~/cert$ openssl rsa -noout -modulus -in SplunkWebPrivate.key | openssl md5 (stdin)= 96c8b8ab66b9217a24df62ea0b354029
splunk@siem:~/cert$ openssl req -noout -modulus -in SplunkWebCert.csr | openssl md5 (stdin)= 96c8b8ab66b9217a24df62ea0b354029
splunk@siem:~/cert$ openssl x509 -noout -modulus -in SplunkWebCombined.pem | openssl md5 (stdin)= 96c8b8ab66b9217a24df62ea0b354029
If they all result in the same hash, continue to the next step. Otherwise you probably concatenated the public cert and CA cert in the wrong order.
Step 8: Modify $SPLUNK_HOME/etc/system/local/web.conf to reflect the new certificates
You can use relative or absolute paths. Below I have opted to use relative paths.
[settings] enableSplunkWebSSL = true privKeyPath = etc/auth/certs/SplunkWebPrivate.key serverCert = etc/auth/certs/SplunkWebCombined.pem
Step 9: Restart Splunk
splunk restart
Step 10: Browse to your Splunk Instance and verify it uses the newly created certificate.
If you don’t want to see the SSL warnings you will have to ensure that your Root CA and any Intermediates are installed in your browser(s).
Thanks for reading.