Using OpenSSL and pfSense to sign a Subordinate Windows Enterprise Certificate Authority
Disclaimer: A Root CA trusted by Active Directory should not be trivialized. Make sure you know what you are doing when working with PKI. Take the time to study the technology before implementing it in production environments. There hasn’t been any extensive testing of this setup, so your mileage may vary.
I have a pfSense Security Gateway Appliance that I use heavily in my home network. One of the features that I have taken advantage of is the ability to create a Certificate Authority (CA) and issue certificates.
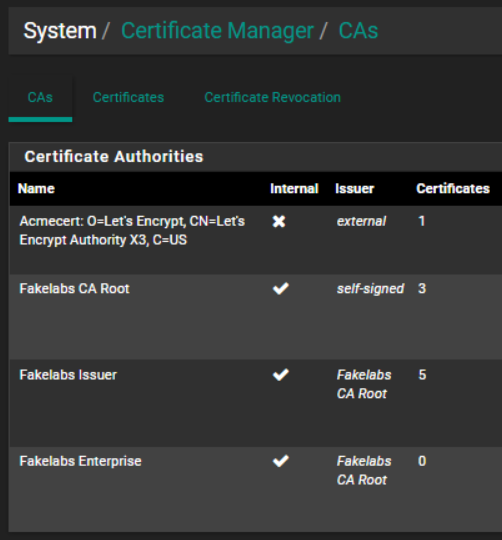
I was recently in a SANS class taught by Jason Fossen and on the third day, “Smart Tokens and Public Key Infrastructure (PKI)”, we created a Windows Enterprise Certificate Authority. Naturally, I thought for fun I could implement this in my lab, but I wanted to make it a subordinate CA and have it signed by my pfSense Root CA. Unfortunately, as of this writing the pfSense Web UI does not support Certificate Signing Requests (CSR) from a Certificate Authority. It only has support for users and servers, which are the more frequently used options to be fair.
The solution is to securely export the pfSense Root CA Certificate and Private Key then upload both files with the CSR to pfSense using [Diagnostics->Command Prompt->Upload File], then use OpenSSL to sign the CSR created by the Windows Server. There are plenty of guides that show how to setup a Subordinate Enterprise CA and I will defer to them.
Once you have those conditions above, ssh into the pfSense device and perform the following tasks:
pfsense:# cd $HOME
pfsense:# mkdir pki
pfsense:# chmod 600 pki
pfsense:# cd pki
pfsense:# touch index.txt openssl.cnf
pfsense:# vi openssl.cnf
Open openssl.cnf with a command line editor, then paste the config below. Remember to modify the CRL Distribution Point (CDP), Authority Information Access (AIA) and any other pertinent values for your setup.
[ca]
default_ca          = fakelabsCA            # The default ca section

[fakelabsCA]
dir                 = .                     # top dir
database            = $dir/index.txt        # index file.
new_certs_dir       = $dir                  # new certs dir

certificate         = $dir/pfSenseRootCA.crt           # The CA cert
serial              = $dir/ca.srl           # serial no file
private_key         = $dir/pfSenseRootCA.key           # CA private key
RANDFILE            = $dir/.rand            # random number file

default_days        = 7360                  # how long to certify for
default_crl_days    = 365                   # how long before next CRL
default_md          = sha512                # md to use

policy              = policy_any            # default policy
email_in_dn         = no                    # Don't add the email into cert DN
x509_extensions     = v3_ca

name_opt            = multiline,-esc_msb,utf8 # Subject name display option
copy_extensions     = copy                  # Copy extensions from request

[policy_any]
countryName            = match
stateOrProvinceName    = optional
organizationName       = optional
organizationalUnitName = optional
commonName             = supplied
emailAddress           = optional

[req]
default_bits        = 4096
distinguished_name  = req_distinguished_name
x509_extensions     = v3_ca
default_md          = sha512
utf8                = yes
dirstring_type      = nobmp

[req_distinguished_name]
countryName_default         = US
commonName                  = "Fakelabs Enterprise"

[v3_ca]
basicConstraints        = CA:TRUE
subjectKeyIdentifier    = hash
authorityKeyIdentifier  = keyid:always,issuer:always
keyUsage                = cRLSign, dataEncipherment, digitalSignature, keyCertSign, keyEncipherment, nonRepudiation
authorityInfoAccess     = caIssuers;URI:http://crl.fakelabs.org/ca_root.pem
crlDistributionPoints   = URI:http://crl.fakelabs.org/ca_root.crl
The command to run after everything is setup:
pfsense:# openssl ca -in win_ca.req -config ./openssl.cnf \
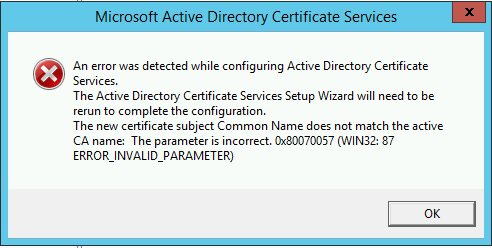
-out windows_ca.crtThe output will be a crt and pem that will need to be uploaded to your Certificate Revocation Server and accessible by the Certificate Services before you install the CA certificate. If you do not properly setup a CRL Server and place the derived crt and pem files properly, you will get an error when installing the CA on the server.

The Common Name (CN) must match what was configured in the CSR or you will get a different error.
The Country and Common Name can be configured from the command line by passing the -subj option:
-subj '/C=US/CN=Fakelabs Enterprise/'If you forgot what the CN value is you can use openssl to view the value:
pfsense:$ openssl req -noout -text -in win_ca.req | grep CN
Subject: C = US, CN = Fakelabs Enterprise
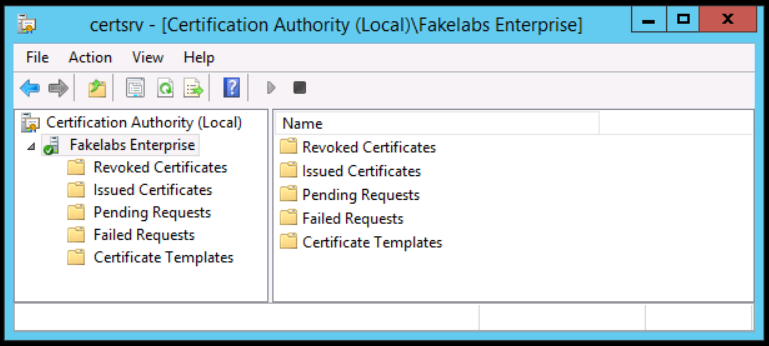
pfsense:$If you did everything correctly you can upload and install your newly signed subordinate CA certificate (.crt) to your Windows Server.
Thanks for reading.